Ingredients
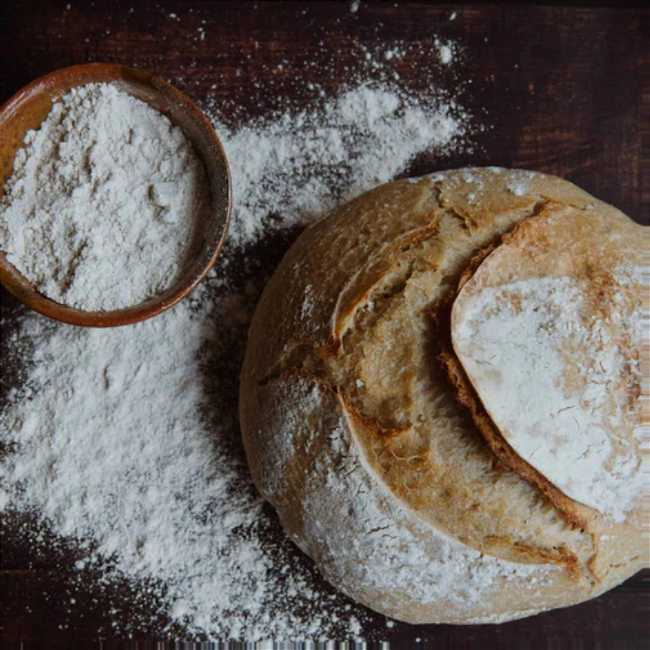
- 1000 g Heritage White Flour or Heritage Bread Blend (*These two flours are easy to work with and will make great bread to get you started. After you get familiar with this process you can use this same recipe to replace some of the flour Heritage White Flour or Heritage Bread Blend Flour with Heritage Whole Wheat Flour or Rye Flour to make whole wheat or rye bread).
- 720 g Water, chlorine-free, 90F (if you have city water you can boil it and let sit for 24 hours)
- 1 tbsp (20 g) Salt - Real Salt or other unrefined salt
- 250-300 g Active sourdough starter
Instructions
- Tip: if your starter is watery and runny, use less water. If your starter is thick, you can increase your water.
- Presoak the flour by combining all 1000g of flour with all 720g of water. Mix for 3-5 minutes into a shaggy dough, then cover for one hour (this is called an autolyze).
- After the presoak, add the salt to the dough and mix enough to combine it. Add the sourdough starter and mix thoroughly. After about 3 minutes of vigorous mixing, it should start to look like bread dough. After 3 minutes of mixing with a dough whisk, switch to your hands and mix for another minute or until you have a smooth bread dough.
- Tip: wet your hands to help the dough not stick. If you flour your hands, you risk incorporating too much flour into the dough.
- Mixing the sourdough into the pre-soaked flour is a little challenging part of this recipe. It can be done by hand or mixer. By hand you should use the “pincer method” of pinching and turning the dough. If you use a mixer, you may have to stop the mixer and use a wooden spoon to stir the pre-soaked dough and starter together. This will help the starter and presoak begin to combine and then you can continue mixing. Once you get the combination started with a wooden spoon, the mixer will be much more successful.
- When mixed into a smooth bread dough, place the dough in a large mixing bowl and cover for a bulk ferment of several hours depending on the temperature of the room. If the temp is more than 70F it will double in size in a few hours. If it is less than 70F, it will take longer so keep an eye on it.
- Once about doubled in size, stretch and fold by grabbing the dough and pulling it up and toward the center in four stretches at 90 degrees each, top, left, bottom, right. Cover and repeat the same stretch and fold in twenty minutes. (The dough needs twenty minutes to relax between stretch and folds). You can decide how many stretch and folds to do, anywhere from 2-5 is common. The dough will get stronger with each stretch and fold.
- Divide into two equal portions, shape and place in bannetons (or greased bowls), or greased bread pans. Cover with a plastic bag and place in the refrigerator for 12 hours.
- After the 12 hours, If the dough looks fully proofed (has nearly doubled in size) you can bake it right away. If it looks like it could use more proofing time, keep it in the plastic wrap and set it on the counter to proof a bit more before baking.
- Heat oven to 425F – 450F. If you are using a Dutch oven, place the Dutch oven in the oven when you start the preheat. A good half hour preheat is required for Dutch ovens.
- Dutch oven method- slash the dough with a razor blade and place it in the preheated Dutch oven. Cover and bake for about 25 minutes. For a darker crust, remove the cover from the Dutch oven after 15 minutes.
- Bread pan method - slash the dough and place in the oven. Reduce the heat to 350F and bake for about 40 minutes. For a darker crust, cover the pan with foil and remove the last 10-15 minutes. For a softer (and lighter) crust, cover the loaf the whole time.
- At the end of the bake time check the inside temperature of bread with a thermometer. It should read 195-205F when done.
- Remove from pan or Dutch oven immediately and let cool on a rack that will allow air to circulate under the bread.
- It is important to understand that it takes practice to get the feel of sourdough baking. If you are not getting the results you desire, you can increase the amount of starter or adjust the hydration. Every time you combine flour, water, salt, and starter, it is an experiment so have fun with it.
Tried this recipe?tag #sunriseflourmill
This has been super helpful for me. I have not made sourdough bread before and it took some time to get the hang of it but I learn new things every time I try. We have been enjoying bread again for the first time in 5 years.
My first loaves are now in the pans to rise. I am super excited and hopeful that I can eat this sourdough bread without the issues caused by gluten.
I hope I have my measurements right as I had to use a converter chart to change from grams to cups in the sourdough recipe.
I bought an inexpensive scale on Amazon about a year or two ago, and I use that more than just about any other baking tool other than my Cuisinart food processor. You can measure by grams or ounces, and it has a “tare” button so you can zero out the weight of the container you’re putting your ingredients into. A very worthwhile investment!
I agree completely. It’s a worthwhile investment.
I also bought a small scale and it is very easy to use and I think makes a big difference with the sourdough measuring.
If you are baking in a Dutch oven, do you line it with parchment or brush it with oil? Or do you put your round loaf directly into the Dutch oven. My Dutch oven is ceramic coated cast iron.
Most recipes use parchment cut larger than the size of the oven but that’s to use the overcut section as handles to assist in dropping the loaf into the hot pan. In truth it messes up the edges of the bread as the dough rises into it during the bake and these marks show up on the bread. If you feel you can do without, I’m guessing a well used Dutch oven would not require any release agent. I’m going to try it myself. People bake on pizza stones frequently.
I flip my banneton over onto the parchment paper in my hand, then score the dough on my counter. I lower the bread into the Dutch oven with the parchment paper, then carefully press the paper to the sides. I then cut the paper down so it doesn’t interfere with the bread rising.
Did you preheat your Dutch oven before adding dough?
I made bread today in my cast iron pot that is smaller than a full dutch oven. Anyhow, I did nothing to the pot, it came out fantastic, didn’t stick at all, and I can eat it with no health problems. I have missed bread from my wheat problems. This heritage wheat is a wonderful discovery.
Can this be made in a bread maker?
Has anyone ever had success adapting this recipe for a bread machine?
Do you need to line the Dutch Oven with parchment paper? In my previous wheat eating life, I used to make sourdough bread in my Dutch Oven, but I always lined it, which I don’t see in your instructions. I’m very excited to try this. I have been eating the Eat Wheat book by Dr. John Douillard and have been following his protocol to prepare my digestion for wheat, which I have not eaten in 6 years. I am SO sick of cardboard gluten free bread!
reading the book, not eating it! 😉
The first time, I made the sourdough bread recipe that came with my order, it turned out poorly. (We ate it anyway.) The second time was not perfect, but pretty good. I LOVE this flour! I have been unable to eat even organic flours and it has been awful! After eating the bread with this flour, I felt like I had been starving to death previously. The bread is SO delicious and satisfying. It reminds me of being a kid and eating bread fresh out of the oven. I thought I was gluten intolerant. Turns out it was not the gluten, but the flour, even organic. I am SO delighted to have bread to eat again. Thank you!
This flour makes amazing sourdough, I substitute about 30 grams of whole wheat with the bread flour. I have been gluten free for about 25 years and I am so amazed I can eat this bread and feel so satiated and healthy. Thank you !!!!!
My question is about kneading. The Video from French kneading is pretty aggressive. The stretch and fold with rests, does that resemble the shaping video ?
Does the gluten break down if over handled as in einkorn?
I only use the stretch and fold method and it comes out great. No kneading.
Is there any difference between the white flour and pizza flour when making pizza dough or use pizza flour for bread? I just want to get the best bang for my buck.
My first attempt didn’t rise, my dough was stiff and dry. I’m trying again today and will limit to five stretch and folds with resting this time and I need to improve on my shaping technique. Hoping my adjustments will improve the results on the second try.
Sounds like my first attempt at making sourdough bread. When I carefully measured ingredients using grams instead of oz it worked much better.
It had suggested that in the recipe I used but I ignored it the first time.
Where do I get a sourdough starter